
Installation instructions for annual accounts system
1. Software requirements
You will need a desktop app of Microsoft Excel 2003 or later
2. Downloading files from the website
Download the workbook by clicking here: Annual accounts system 1.3.
Once it is downloaded, open it in Microsoft Excel.
3. Saving the workbook on your computer
Click Save As in the File menu in Excel.
Choose a place in your computer filing system to store these files.We suggest you create a new folder for the accounts system. You could call this Accounts.
Give the spreadsheet a name, which we suggest could include your group name and the current financial year.
Click Save. This will be your new accounts system.
It is a good idea to also make a second blank copy, before you start using the system. You can keep this so that you don’t have to download it again next year. To do this, click Save As again in the File menu in Excel. This time, name it “Blank accounts system”.
At the start of each financial year, open the blank copy and click Save As, to save a new version. Name the new version to reflect the relevant year (for example Accounts 2011-12.xls).
This way, you won’t enter figures into the blank workbook, and it will still be there for you to copy over at the start of the following year. Don’t worry though – you can always just download another copy from our website if you need to.
4. Making sure the system will work correctly on your computer
The system uses macros – automated instructions which make the various buttons work. The accounts system won’t work unless macros are enabled. We have digitally signed the macros, which gives a guarantee that they are not harmful.
You need to let your computer know that you want the macros to be enabled when you are using this system. How you do this depends on which version of Excel you have.
4.1 If you are using Microsoft 365
4.1.1 Cannot download or open the workbook
You may have been blocked entirely from downloading or opening the workbook if you are using Microsoft 365. To fix this you will need to add the Resource Centre website as a trusted site. You do this by opening Internet Options on your computer.
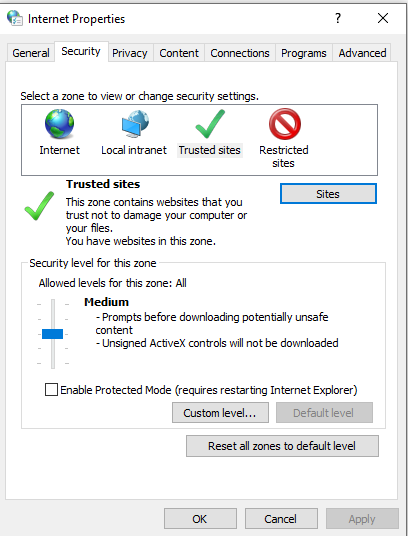
In the Security tab, click on Trusted sites, then click on the Sites button. A second dialogue box will open and you will have the option of adding sites to your trusted zone. Add https://resourcecentre.org.uk then close the second dialogue box. Click Apply and then OK.
4.1.2 Make your folder a Trusted Location
Open the workbook and go into the File menu, then choose Options at the very bottom of the menu.
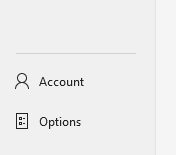
In the Options dialog box, click on Trust Center, and then on the Trust Center Settings button.

Choose Trusted Locations from the left hand menu and then click on Add location
Browse until you can see the folder where you have saved the workbook. Select the folder to add it to the list of trusted locations and click OK on all windows. Close the workbook and reopen it.
4.1.3 Enabling macros
When you open the workbook for the first time (sometimes even if you have added the Resource Centre as a trusted website and saved it in a trusted location), you may need to enable the macros. If you get a yellow bar appearing at the top of your workbook, you need to click on enable content or enable editing.
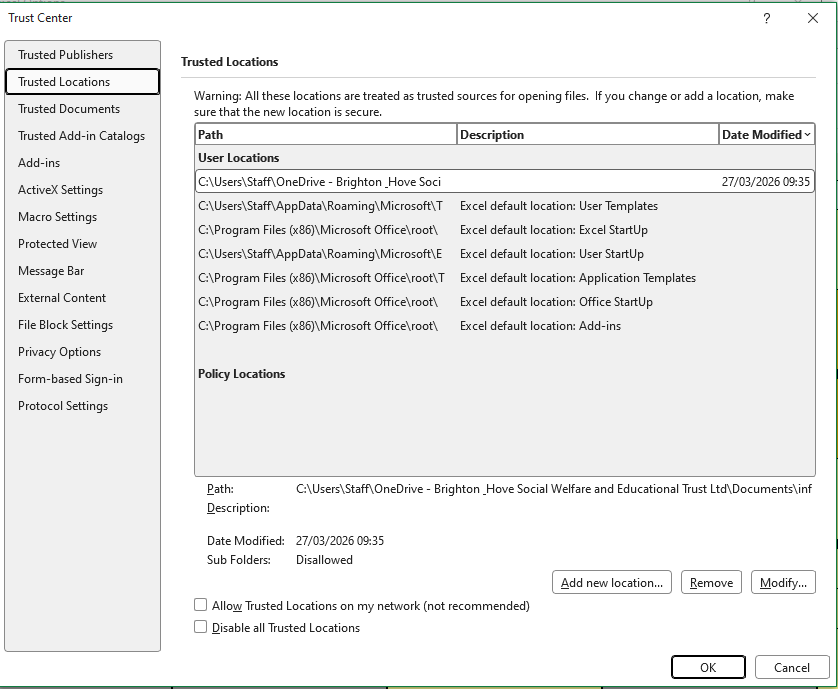
If you get a red bar appearing at the top of your workbook, you need to go into File then Info. If the screen looks like the image below, you can choose Enable All Content and the macros should work every time you open the document.
If you go into File and Info and there are no security options available, you can try this instead. Close the workbook, then open the folder you saved it in when you downloaded it. Right-click on the file and go to Properties. In the General tab, there will be a security option at the bottom.

Tick Unblock, then click Apply, then OK. Open the workbook again and you should be able to enable content or enable macros on the yellow bar at the top of the workbook.
3.2 If you are using Excel 2010 or a later version
The first time you open the document, a yellow message bar will appear, like this:
![]()
Click the Enable Content button. This will mean the document becomes a Trusted Document, and should open without problems in future. You will need to repeat this at the start of each year, when you are working on a new document.
3.3 If you are using Excel 2007
When you first open the spreadsheet, a message bar will appear at the top of the screen, like this:
![]()
Click the Options… button and you will see this box:

Choose Enable this content and click OK. The spreadsheet should now work properly. You will need to do this again if you download a new workbook next year.
Updated March 2026